If you don’t know your WordPress website’s original username and email for login to Dashboard and your very trouble and not possible also recover your account, So in this case you create new user from your Database, So if you want to add a new user to WordPress using by Database, using MySQL, using phpMyAdmin or a other similar tool, you can use the following method for doing that.
Here are Example: WordPress Users Manager Page.

First of all you have to need access on your (cPanel / Plesk / Web Hosting / Managed WordPress) whichever you are using, if you are your website owner and you don’t know about this so then ask your Hosting provider, or if you have access on this so then OK, Lets go start for How to Create a new WordPress admin user From Database.
INSTRUCTION
Step 1: Login to your Hosting Panel with your current username and password which is provided by Hosting provider, for example if you are using cPanel login to cPanel like this mydomain.com/cpanel

Step 2: Now click on “phpMyAdmin” from section of DATABASE:

Step 3: Now click on you current Database name and after then click on “wp_users” table

Step 4: After click on wp_users then now click on “Insert” options from top menu section for example see the below image:

Step 5: Fill in the following fields.
- ID This is any number you choose or leave it empty.
- user_login This is the username for accessing the your WordPress Dashboard.
- user_pass is the password for the user. Make sure to select MD5 in the functions menu
- user_nicename This is the nickname for the user
- user_email This is the email address you want to associate with this user type any of your new email ID.
- user_url This is for your website name if you have insert it or you can leave empty.
- user_registered This the date and time for when this user is registered record.
- user_status It is should be set to 0.
- display_name This is the name that will be displayed for this user on your WordPress website or WordPress Dashboard.
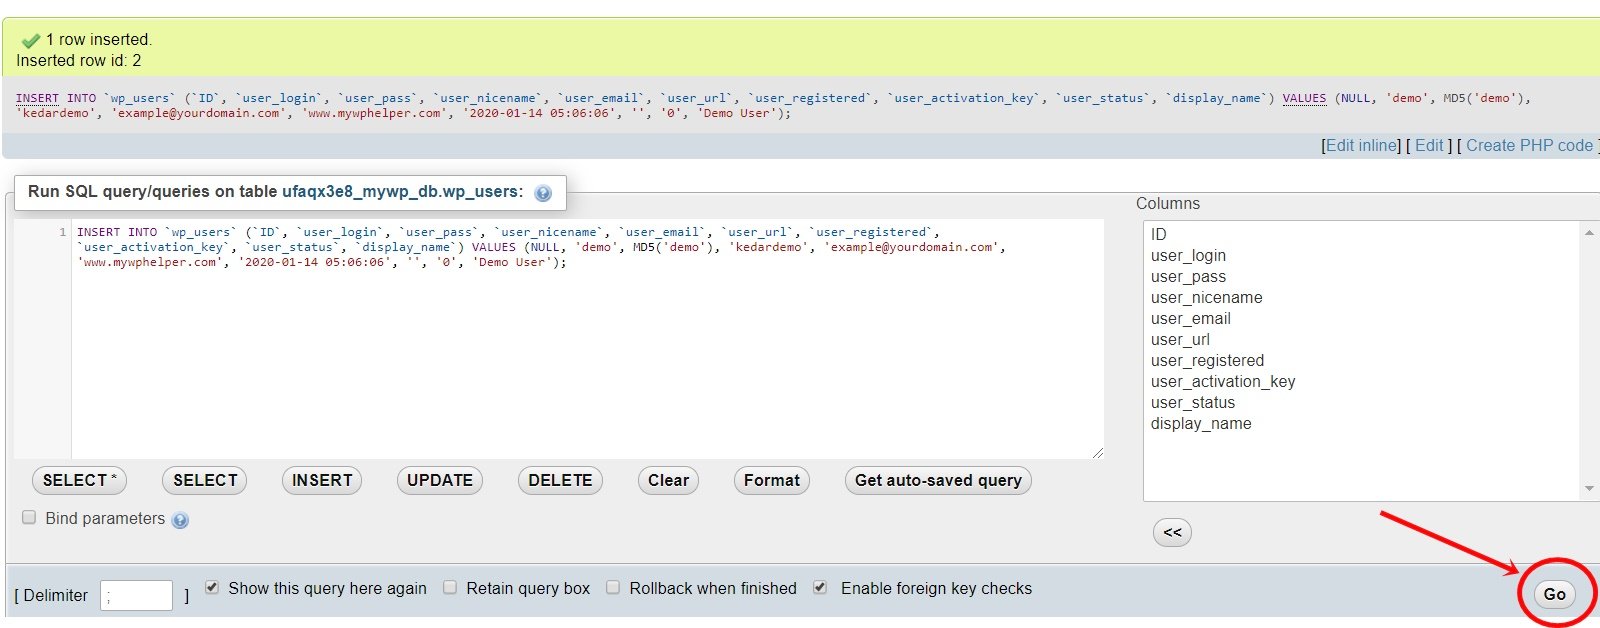
For more example you can see the screenshot of image.

After fill up the necessary column and now click on “Go” button.
Step 6: Now also click on “Go” button from right button corner.

Here is a Example after new User register from Database.

Step 7: Now click on “wp_usermeta” table from current Database.

Step 8: Now click on “Insert” options from wp_usermeta tabel and insert the following value.
- umeta_id This is any number you choose or leave it empty.
- user_id This is the ID you entered in the previous step, and here i have entered “2” because my previews user id is this
(Do you want to know also your previews user id? Go to the “wp_users” tabel and find the “ID“) - meta_key It is should be the phrase wp_capabilities
- meta_value it is should be a:1:{s:13:”administrator”;s:1:”1″;}

Now clikc on “Go” button and then “Go” continue.
Step 9: One more step: Same follow the from above given Step 7: method and insert another row with the following given information:
- umeta_id – No need to fill up and leave this blank, it will be auto-generated
- user_id – This will be the ID of the user you created in the previous step. Remember we picked 2.
- meta_key – this should be wp_user_level
- meta_value – 10
Now clikc on “Go” button and then “Go” continue.
Using By SQL query:
For only developers: if you want to speed this process up, you can simply copy and paste this SQL query in your database and make your work fast.
INSERT INTO `databasename`.`wp_users` (`ID`, `user_login`, `user_pass`, `user_nicename`, `user_email`, `user_url`, `user_registered`, `user_activation_key`, `user_status`, `display_name`) VALUES (‘2’, ‘demo’, MD5(‘demo’), ‘Your Name’, ‘[email protected]’, ‘http://www.youdomain.com/’, ‘2020-01-14 00:00:00’, ”, ‘0’, ‘Your Name’);INSERT INTO `databasename`.`wp_usermeta` (`umeta_id`, `user_id`, `meta_key`, `meta_value`) VALUES (NULL, ‘2’, ‘wp_capabilities’, ‘a:1:{s:13:”administrator”;s:1:”1″;}’);
INSERT INTO `databasename`.`wp_usermeta` (`umeta_id`, `user_id`, `meta_key`, `meta_value`) VALUES (NULL, ‘2’, ‘wp_user_level’, ’10’);
Note: to change the databasename to the database you are working with. and also don’t forget to change the appropriate values otherwise it will not work if values incorrect.
Finally you can now log into your WordPress website using by this newly created WordPress User account. if necessary you can also use this account to change the password of your other user accounts or delete them.
In the end
I hope you have found this article helpful. Let us me your opinion or questions if any through the comment form in below or use this form to ask your question.


